
설치
mariadb : 클라이언트 프로그램이다
mariadb-server : 데이터베이스 서버 프로그램이다
yum -y install mariadb-server mariadb
실행하기
systemctl enable -- now mariadb
DB 접속 명령어와 종료 명령어
//접속

mysql
// 종료

exit
MySQL 비밀번호 설정하기 ( 로컬 접속 시 )
mysql -u root password '1234'
접속하려면?
mysql -u root -p
MySQL 한글화 설정하기 ( CentOs 8 기준 )
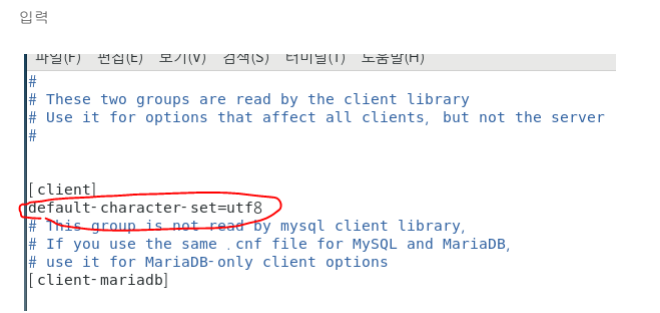
cd /etc/my.cnf.d
vi client.cnf

default-character-set=utf8
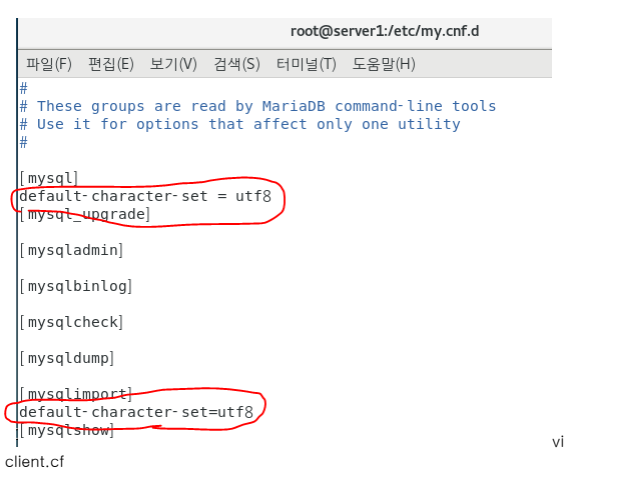
vi mysql-clients.cnf

[mysql]

default-character-set = utf8

[mysqlimport]

default-character-set=utf8
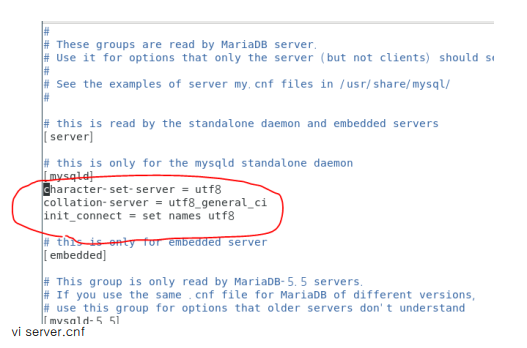
vi mariadb-server.cnf

[mysqld]

character-set-server = utf8
collation-server = utf8_general_ci
init_connect = set names utf8
재시작 시키기 & 설정확인
systemctl restart mariadb

mysql

status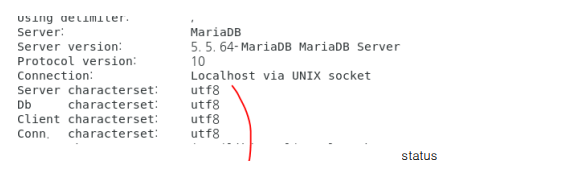
원격접속 설정하기
// 원격접속의 비밀번호를 4321로 설정

grant all privileges on *.* to root@'192.168.1.%' identified by '4321'
*.* 는 모든 데이터베이스의 모든 테이블에 권한을 준다는 뜻입니다.
Haproxy를 이용해서 Database 로드밸런싱 설정하기 ( L4 Level )
로드밸런싱할 컴퓨터에 haproxy를 설치한다
yum -y install haproxy
haproxy 에 여러대의 데이터베이스 서버를 등록한다
vi /etc/haproxy/haproxy.cfg

global
    log         127.0.0.1 local2 info
    chroot      /var/lib/haproxy
    pidfile     /var/run/haproxy.pid
    maxconn     256
    maxsslconn  256
    user        haproxy
    group       haproxy
    daemon

defaults
      # set "mode tcp" for Layer4
    mode               tcp
    log                global
    timeout connect    10s
    timeout client     30s
    timeout server     30s

# define frontend and backend servers
frontend  mysql-in
    bind *:3306
    default_backend    backend_servers

backend backend_servers
    balance            roundrobin
    server             db01 10.0.0.31:3306 check // 데이터베이스의 IP 주소
    server             db02 10.0.0.32:3306 check // 데이터베이스의 IP 주소
주의 **
데이터베이스간 동기화는 아직 다루지 않았기 때문에, 로드밸런싱을 하면 서로 다른 내용을 가진 데이터베이스들이 생긴다.
728x90
'기타 > 서버&클라우드' 카테고리의 다른 글
| 서버 & 클라우드 교육 16일차 - 방화벽 컴퓨터 만들기 (0) | 2024.03.15 |
|---|---|
| 서버 & 클라우드 16일차 - HTTP 와 HTTPS (0) | 2024.03.14 |
| DNS 서버 주영역, 보조영역으로 나눠서 구축하기 [아직 정리 x ] (0) | 2024.03.12 |
| Nginx, Apache 웹 서버, NFS 서버 로드밸런싱(haproxy)으로 구성해보기-1 (0) | 2024.03.11 |
| 서버 & 클라우드 교육 12일차 (0) | 2024.03.08 |